• Skip to primary navigation
  • Skip to main content
  • Skip to primary sidebar
  • Skip to footer

Her Modern Kitchen

Eating & Living in Austin, Texas

  • About
  • Recipes
  • Austin
  • Lifestyle
  • Baking Bucket List

goat cheese

Truffle and Goat Cheese Soufflé

August 17, 2020 by Alyssa

A savory Truffle and Goat Cheese Soufflé made with truffle salt, mushrooms, sage, and goat cheese crumbles that’s ready in less than an hour.

So often I make a recipe, document it, photograph it, then never find the time to actually post about it.  And that’s exactly what happened with this Truffle & Goat Cheese Soufflé.   

I actually made this recipe last December. Like 8 months ago.

I made it because a soufflé was on my 2019 Baking Bucket List.  I chose a soufflé as part of my bucket list because it always seemed like something difficult to make.  I’m not sure why, maybe it’s because I always saw soufflés on fancy restaurant menus and thought that they must take a great deal of culinary skill to make.

Truffle Goat Cheese Soufflé

However, even 8-months after making my first soufflé, what I’ve learned, is that they’re not that difficult to make.

In fact, like most things in the kitchen, a soufflé is quite straightforward as long as you are patient, follow instructions, and have the proper equipment.  In this case, a hand mixer, which is 100% necessary for making fluffy egg whites, the star ingredient in soufflés.

Truffle Goat Cheese Soufflé

My Truffle and Goat Cheese soufflé was inspired by some truffle salt and truffle butter I received as a hostess gift.  Truffle is such a delicious, powerful flavor and something I typically save for special occasions or dishes.  This day, making my soufflé, I decided I needed to use a special ingredient since the soufflé was so high on my baking bucket list and I wanted it to feel special.

Find more baking bucket list recipes here.

Not wanting to upstage the truffle flavor, I paired it with finely diced baby Bella mushrooms and creamy, tangy goat cheese crumbles.  The result was a savory, light soufflé with a hint of truffle.  It made the perfect fancy lunch and was delicious leftover at breakfast the next day.

And, now that I’ve finally posted about it, I’m craving a savory breakfast soufflé and may have to break out the truffle salt again to whip one up.

Happy cooking!

Baking Bucket List: Truffle & Goat Cheese Soufflé
 
Save Print
Prep time
30 mins
Cook time
20 mins
Total time
50 mins
 
Author: Alyssa
Serves: 4
Ingredients
  • 1½ cups finely diced baby Bella mushrooms, ~3/4 cup once diced
  • 1½ teaspoons olive oil
  • 1 small shallot, diced
  • 1 clove of garlic, minced
  • ½ teaspoon Italian seasoning
  • 1 tablespoon unsalted butter
  • 1½ teaspoon truffle butter
  • 2 tablespoons all-purpose flour
  • 1 cup whole milk
  • 1 teaspoon Dijon mustard
  • ½ teaspoon truffle salt
  • 4 ounces crumbled goat cheese
  • 3 large egg yolks
  • 5 large egg whites (3 egg whites from the full eggs)
  • ¼ teaspoon cream of tartar
Instructions
  1. Preheat oven to 375 degrees F. Coat four 10-ounce ramekins (or a 2- to 2½-quart souffle dish) with butter and place them on a baking sheet.
  2. Heat the olive oil in a small frying pan then add the shallots, garlic, Italian seasoning, and mushrooms. Sauté until cooked through 5-6 minutes.
  3. In a separate saucepan over medium-high heat, melt the unsalted butter and truffle butter. Whisk in the flour and cook, whisking, for 1 minute. Adjust heat as needed to prevent the mixture from getting too dark; it should be the color of caramel. Add in the milk, mustard, and truffle salt and cook, whisking constantly, until thickened, 1 to 2 minutes. Remove from heat and immediately whisk in goat cheese and 3 egg yolks until well combined. Transfer to a large bowl.
  4. Beat the 5 egg whites in a medium bowl with an electric mixer on high speed until soft peaks form. Add the cream of tartar and continue beating until stiff peaks form.
  5. Gently fold half of the whipped whites into the milk-egg mixture. Gently fold in the remaining egg whites and the reserved mushrooms just until no white streaks remain. Transfer to the prepared ramekins or souffle dish.
  6. Bake until puffed, firm to the touch, and an instant-read thermometer inserted into the center registers 160 degrees F, about 20 minutes in ramekins or 30 minutes in a souffle dish. Serve immediately.
3.5.3251


Filed Under: Breakfast Tagged With: baking bucket list, goat cheese, soufflé, truffle salt

Grilled Mediterranean Zucchini featuring Morton Salt Coarse Sea Salt

July 3, 2018 by Alyssa

Nail your 4th of July party menu with this recipe for Grilled Mediterranean Zucchini starring Morton Salt Coarse Sea Salt, fresh herbs and goat cheese crumbles.

This post is sponsored by Morton Salt. All opinions, recipe, and photos are my own.
Thanks for supporting the brands that support Her Modern Kitchen.

Grilled Mediterranean Zucchini

Since most 4th of July parties already involve firing up the BBQ, adding grilled vegetables to the menu is an easy, no hassle side dish. For Grilled Mediterranean Zucchini with Herbed Sea Salt, Morton Coarse Sea Salt is used to deliver a burst of flavor to otherwise mild zucchini when mixed with fresh, seasonal herbs.

To finish the dish, roasted tomatoes, goat cheese crumbles, and walnuts are added giving the dish texture and zest. You can serve the zucchini as an herby summertime side dish or make it a creative main meal for your vegetarian visitors.

Why choose coarse sea salt for this dish?

It’s common knowledge that salt is an important ingredient when cooking, in fact, rarely do you see a sweet or savory recipe without it. Salt has the ability to enhance flavor and when mixed with food, it helps the food release aromas that elevate the perception of taste, making us want to indulge in the food.

Herbed salt

This dish features zucchini but the star is truly the Coarse Sea Salt from Morton Salt which is used to deliver the mix of fresh basil, oregano, and lemon zest. The coarse sea salt provides a more dramatic impact when compared to a finer grain of salt.  It also adds a note of texture to the zucchini.

Grilled zucchini

In my opinion, coarse salt allows you to spread the salt flavor across the dish without overpowering the dish. This is why coarse salt works so well for for the Grilled Mediterranean Zucchini, delivering those small bursts of flavor in each bite making it delicious!

Grilled Mediterranean Zucchini

Prep in advance so you can enjoy the party too!

When I entertain, I like to balance the time I spend cooking and mingling while enjoying the party with my guests.  It’s especially important during the 4th of July season when there’s so much emphasis on relaxing and having a good time with family and friends.

Her Modern Kitchen

All the components of this Grilled Mediterranean Zucchini dish can be prepared ahead of time so all you have to do when it’s time to eat is grill the zucchini. Once the zucchini is grilled, the dish is quick and easy to assemble while entertaining guests.

4th of July Table for Grilled Mediterranean Zucchini

To prep ahead of time

  • Roast the tomatoes the day before your party and refrigerate them until serving
  • Prep the herbed sea salt the day-of and store covered in the refrigerator
  • Slice the zucchini, brush them with the olive oil, garlic, and black pepper mixture then cover the zucchini until it’s time to grill

When you’re ready to eat, heat the grill and cook the zucchini. Finish the dish by topping each zucchini half with the herbed sea salt, goat cheese crumbles, chopped walnuts, and roasted tomatoes.

So here’s to delicious food, lots of time with family & friends and a happy 4th of July!

Grilled Mediterranean Zucchini

5.0 from 4 reviews
Grilled Mediterranean Zucchini with Herbed Morton Coarse Sea Salt for easy entertaining
 
Save Print
Prep time
15 mins
Cook time
10 mins
Total time
25 mins
 
Author: Alyssa
Serves: 6
Ingredients
  • 3 large zucchinis
  • 1 tablespoon olive oil
  • 1 large garlic clove, minced
  • ½ teaspoon black pepper
  • 2 teaspoons Morton Coarse Sea Salt
  • 4-5 sprigs fresh oregano plus more for garnish
  • 6-8 large basil leaves plus more for garnish
  • 1 teaspoon lemon zest
  • ¼ cup goat cheese crumbles
  • 2 tablespoons roughly chopped walnuts
  • roasted cherry tomatoes, optional for serving*
  • lemon slices, optional for serving
Instructions
  1. Prepare the zucchini by slicing each squash in half lengthwise
  2. Mix together the olive oil, minced garlic, and black pepper in a small bowl
  3. Lightly brush the olive oil mixture over both sides of the zucchinis
  4. Prep the herbs for the herbed sea salt by stripping the oregano leaves from the stems
  5. Finely mince the basil leaves and oregano until you have roughly 2 tablespoons of finely chopped herbs
  6. In a small bowl, stir together the herbs, lemon zest, and Morton Coarse Sea Salt
  7. When ready to eat, heat the grill to ~450°F
  8. Place the zucchinis cut side down over medium-high flame and cook covered for 5-6 minutes
  9. Flip the zucchini over and grill the outside for another 3-5 minutes until the zucchini halves are soft and give when pricked with a fork
  10. Place the cooked zucchini on a serving tray, cut side up
  11. Generously sprinkle the herbed sea salt over top of the zucchini followed by the goat cheese crumbles, chopped walnuts, and roasted cherry tomatoes, if using
  12. Garnish with lemon slices and additional herbs before serving
Notes
*To make the roasted cherry tomatoes, toss 1 cup cherry tomatoes with 1 teaspoon olive oil, a pinch of Morton Coarse Sea Salt and black pepper. Roast for 10 minutes in the oven at 425°F or until tomatoes burst.
3.5.3251


Filed Under: Side Dishes Tagged With: 4th of july, entertaining, goat cheese, holiday, mediterranean, morton salt, sea salt, zucchini

Blistered Shishito Peppers with Goat Cheese & Cilantro Lime Sauce

August 15, 2017 by Alyssa

This healthy recipe for Blistered Shishito Peppers with Goat Cheese & Cilantro Lime Sauce makes for a great seasonal side dish with minimal effort!

The first time I had Shishito Peppers was years ago at The Cheesecake Factory. I had no idea what they were but I remember they were on the restaurant’s skinny menu (do you remember that menu?) and they were probably the healthiest, low-calorie item on that list.

Blistered Shishito Peppers & Sauce 2

Since then, Shishito Peppers have exploded across the culinary spectrum. They’re kind of like the avocado toast of the pepper world. No doubt, you’ve seen them for $8 a pop on menus from all sorts of restaurants. And since they’re simply nothing more than a roasted pepper, they’re a healthy option on most menus, even if paired with a dipping sauce or aioli.
 Blistered Peppers
Although Shishito Peppers are served throughout the year at most restaurants, these small, mild peppers are actually a seasonal item. Shishito Peppers are at their prime in mid to late summer which makes August a great time to enjoy them at home by whipping up my recipe for Blistered Shishito Pepper with Goat Cheese & Cilantro Lime Sauce.
Trader Joe Shishito Peppers
I picked my Shishito Peppers up a Trader Joe’s (because they’re $1.99 a pack) and seriously just as fresh as what I found at the farmer’s market for $5 a quart!  I love Shishito Peppers because they’re so light, fresh, and fun to eat! They have a mild spice (though sometimes you may find a spicy bad boy of a pepper in the mix), they’re easy to make, and are an awesome summer time snack.
Blistered Shishito Peppers
Blistered Shishito Peppers and Goat Cheese
Although you can enjoy Shishito Peppers solo, I like mine with a bit of course sea salt and some kind of dipping sauce on the side. Since I loved the cilantro lime goat cheese paired with my Grilled Avocados, I decided to take a similar approach with this recipe.  To compliment the mild spice of the Shishito Peppers, I created a creamy lime & cilantro goat cheese dipping sauce. I love the tang of the goat cheese paired with the subtle spice of the pepper. And the lime & cilantro bring a cooling element to the dish that completes the whole taste profile – spicy, tangy, creamy, and cool!
Enjoy this recipe for Shishito Peppers with Goat Cheese & Cilantro Lime Sauce as a snack while mixing up dinner, by the pool, or pair it with a minerally Sauvignon Blanc for an awesome summertime happy hour!
Blister Shishito Peppers
5.0 from 3 reviews
Blistered Shishito Peppers & Creamy Goat Cheese Dipping Sauce
 
Save Print
Prep time
10 mins
Cook time
5 mins
Total time
15 mins
 
Author: Alyssa
Serves: 2
Ingredients
  • 6 ounces shishito peppers
  • 2 ounces goat cheese crumbles
  • 2 teaspoons lime juice
  • 2-3 tablespoons milk
  • ¼ teaspoon garlic powder
  • 2 tablespoons roughly chopped cilantro
  • ½ teaspoon kosher salt
  • coarse sea salt for serving
  • olive oil spray
Instructions
  1. Prepare the oven by placing an oven rack on the second to highest rung and turn the oven to broil (high broil if your oven has a high and low setting). While the oven heats, prepare the peppers and dipping sauce.
  2. Prep the Peppers: Rinse the peppers and pat dry with a paper towel.
  3. Lay the peppers out in a single layer on a large baking sheet.
  4. Lightly spray the peppers with olive oil and set aside while you make the dipping sauce.
  5. For the Sauce: Place the goat cheese, lime juice, garlic powder, ½ teaspoon salt, cilantro, and 2 tablespoons of milk in the food processor.
  6. Processor everything for 10-15 seconds until combined.
  7. Scrape down the sides and continue to process in 10-15 second increments until the cilantro lightly specs the sauce.
  8. If you need the sauce to be a bit thinner, add the 3rd tablespoon of milk and process again for 10-15 seconds.
  9. Cooke the Peppers: Once the sauce is made, place the peppers in the oven on the 2nd highest rack near the broiler and broil on high for 3-5 minutes.
  10. As you begin to broil the peppers, you may hear popping, and that's okay.
  11. After 3 minutes, lightly shake the pan, moving the peppers around the pan then close the oven door and cook another 30 seconds. Continue to shake the pan every 30-60 seconds until the peppers have blistered.
  12. Once cooked, remove the peppers from the oven and immediately sprinkle with sea salt.
  13. Serve immediately with dipping sauce on the side.
3.5.3226

Filed Under: Side Dishes, Snacks Tagged With: goat cheese, pepper

Grilled Avocado with Herbed Goat Cheese & Chimichurri

June 15, 2017 by Alyssa

Grilled Avocado with Herbed Goat Cheese and Chimmichurri are a creamy, flavorful side dish that’s destined to become your new summertime grilling favorite!

Grilled Avocado with Herbed Goat Cheese & Chimichurri is a super easy summer side dish that you’ll be making over and over again throughout grill season! This dish also does double-duty as you can use the chimichurri sauce to marinate meat and grill up while cooking the avocado! #dinnermadeeasy

Grilled Avocado with Goat Cheese

The key to this recipe is finding the perfect avocado — the Goldilocks avocado — not too firm, not too ripe, but jusssttt right!

Now, I know you’re not supposed to go squeezing all the avocados at the grocery store but for this recipe, it’s pertinent!

I prefer Haas avocados (specifically, Avocados from Mexico!) because they’re typically large and in my opinion, much more flavorful than the other tiny avocados grown from who knows where!

To determine the best avocado for Grilled Avocado with Herbed Goat Cheese & Chimichurri, start by looking for the largest avocados your store has available. Pick them up and begin squeezing.

You don’t want the avocado to be rock hard, where there’s no give when squeezed. Those avocados won’t soften enough once grilled.

Grilled Avocado with Goat Cheese

You also don’t want the avocados to be too soft, like when you squeeze and your finger leaves a permanent indent in the avocado! Those avocados will be too ripe and not hold up well when put to the high heat of the grill.

My perfect avocado for this recipe is a palm-sized avocado that’s on the firmer side of the scale but has a gentle give that springs back into place when pressed lightly with your fingers. It’s the type of avocado that you’d want to set out for 1 day on the counter before cutting into to smash and smear on your sandwich.

While you’re at the store picking out your avocado, be sure to grab all the fresh herbs, limes and a head of garlic for my go-to chimichurri sauce, you’ll be making this to drizzle on the avocado after it comes off the grill. It’s also great for marinating chicken or drizzling on top of steak — if that’s your jam!

Grilled Avocado with Goat Cheese

Lastly, before you check out at the grocery store and head home to whip up my Grilled Avocado with Herbed Goat Cheese & Chimichurri — make one last stop by the cheese department to pick yourself out a creamy, herbed goat cheese.

You can definitely make your own herbed goat cheese by choosing a traditional brick of Chevre and mixing in your own dried herbs but there are so many awesome pre-made choices out there that will make this side dish oh-so-easy. My preferred herbed goat cheese is Cypress Grove Herb of Humboldt. It’s flavorful, delicious and seriously spreadable.

When you’re ready to make my Grilled Avocado with Herbed Herbed Goat Cheese and Chimichurri, you’ll need to fire up the grill and preheat it to about 500*F. Slice the avocado in half, brush the inside with lime juice & olive oil, sprinkle it with some smoked paprika, salt & pepper and place it cut-side down on the grill and shut the lid.

Now, listen up! This is important!  Leave the avocado and set a timer for 90 seconds! Don’t touch it! Don’t you dare take a peek at it.

After 90 seconds, pick it up with some tongs, rotate it 90 degrees and wait another 90 seconds. By letting the avocado and grill do their thang, you’ll get those beautiful, charred grill marks on your avocado that make it look restaurant-worthy.

As soon as the grilled avocado’s done, place it on a smear of goat cheese, drizzle it with the chimichurri sauce and grab a spoon to dig in to the most delicious, decadent summer side dish. It’s out of this world creamy, salty and flavorful and destined to become your new summertime grilling addiction.

Grilled Avocado with Goat Cheese Pin

5.0 from 4 reviews
Grilled Avocado with Herbed Goat Cheese & Chimichurri
 
Save Print
Prep time
5 mins
Cook time
5 mins
Total time
10 mins
 
Author: Alyssa
Serves: 2
Ingredients
  • 1 large avocado
  • 2 teaspoons lime juice
  • 1 teaspoon olive oil
  • ½ teaspoon kosher salt
  • ¼ teaspoon black pepper
  • ½ teaspoon smoked paprika
  • 2-3 tablespoons url:1]chimichurri sauce[/url] or store bought
  • 1-2 ounces herbed goat cheese, softened like Cypress Grove
Instructions
  1. Preheat the grill to ~500*F (or as high as you can get it).
  2. Cut the avocado in half and remove its pit.
  3. Lightly brush the cut side of the avocado with lime juice to prevent browning followed by a light brushing of olive oil.
  4. Sprinkle the cut avocado with salt, pepper, and smoked paprika.
  5. Prep the serving plate by smearing the goat cheese across the center of the plate and set aside.
  6. Using tongs place the avocado cut side down onto the hot grill and cook for 90 seconds with the grill lid down.
  7. After 90 seconds, rotate the avocado 90 degrees and cook for another 90 seconds with the lid down.
  8. Using tongs, remove the avocado from the grill and place cut side up on the prepared plate with goat cheese.
  9. Drizzle with chimichurri sauce and serve immediately.
3.5.3239

Filed Under: Side Dishes Tagged With: avocado, chimichurri, goat cheese, grill, summmer

Panko Crusted Goat Cheese Salad

January 25, 2012 by Alyssa

Usually while dining, the term “cheesy” refers to calorie bomb, most often in the form of a creamy, gooey,  or melted.  Though delicious, this cheese is usually accompanied with something being fried (MozzSticks), smothered (Enchiladas), or creamy (Alfredo).

Now cheese isn’t bad but there is a good and bad way to eat it.

CheeseStick – Good: Go for lowfat and have it with some almonds or an apple as an afternoon snack.  I love Sargento because they even make flavored sticks like Pepper Jack & White Cheddar to switch it up.

Feta- Good: Enjoy it on a salad.  The harder the cheese the better it is for you, honestly. Atheno is  my personal favorite, even the reduced-fat version is amazing. Sprinkle it on salads and wraps.

Alfredo – Bad: It not only involves cheese but cream as well which is code for fat.

Queso – Bad: Not only is it creamy, gooey, and melted but it comes with a side salty chips.  And you no, once you start you can’t stop.

If you really want cheese in your diet – try shredded cheese, a little goes a long ways and make it the reduced-fat or part-skim version.  Cabot makes a great 50% fat free cheese in a variety of flavors.  Need blue cheese, swiss cheese, Mexican cheese, or an herby cheese?  Try Laughing Cow wedges.  They’re 35 calories and low in fat.  I’ve used them for quesadillas, buffalo wraps, alfredo sauces, and even just plain ol’ cheese & cracker snacks.  This company is also the maker of the famous mini Babybel cheese rounds.  Those are good in moderation as well – like a cheese stick type snack.

This being said, the king of cheese, at least in my opinion, is Goat Cheese aka Chevre. It’s French.  It’s fancy.  It’s creamy.  It’s decadent. It’s full of flavor.  It usually have 70-80 calories per ounce and around 6g of fat. Totally reasonable for cheese.  Plus they make all types – spreadable logs, crumbles, and even cream cheese, I have a Fig flavor that’s great on bagel thins.

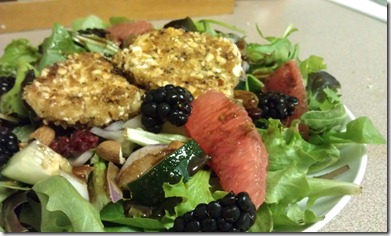
The below recipe is my ode to Chevre.  Healthified of course!  Often times while dining out, I’m drawn to a specific goat cheese salad, the encrusted goat cheese medallion salad that I often find on restaurant menus.  However, I’ve never ordered it for I know the truth about this salad.  This once healthy salad is destroyed in a restaurant kitchen with a dip in the fryer resulting in oil soaked cheese rounds.

So here’s my version at home version that’s quick and healthy.

IMAG1228

Encrusted Goat Cheese Salad with Grapefruit Balsamic
 
Save Print
Prep time
30 mins
Cook time
20 mins
Total time
50 mins
 
Serves: 2 salads
Ingredients
  • ¼ cup panko bread crumbs
  • 3 tablespoons whole almonds, finely chopped in a food processor
  • ¼ teaspoon salt
  • ¼ teaspoon pepper
  • ½ teaspoon dried basil
  • 3 tablespoons flour
  • 3 tablespoons liquid egg whites or 1 egg white
  • 1-4oz log of Chevre cut into 6 rounds
  • 1 grapefruit (3/4 sections with skins removed, ¼ used for juicing)
  • Spring mix (3-4 cups or desired salad size)
  • ¼ cucumber, diced
  • a handful of berries of choice, as garnish
  • additional almonds, coarsely chopped, as garnish
  • ¼ cucumber, diced
  • handful of berries of choice, as garnish
  • additional almonds, coarsely chopped, as garnish
  • 3 tablespoons fresh squeezed grapefruit juice (about 1 quarter of the fruit)
  • 3 tablespoons balsamic vinegar
  • 1 – 2 teaspoons agave nectar or honey
Instructions
  1. In a bowl mix breadcrumbs, almonds, salt, pepper and basil.
  2. In a 2nd bowl, place flour.
  3. In a 3rd bowl place egg whites.
  4. Next, cut four goat cheese rounds. If you have trouble cutting the rounds, warm the knife under hot running water to make the cut a bit easier, then mold and flatten to get your desired round shape.
  5. Take our four goat cheese rounds and dip the rounds in the flour then egg whites, then panko-almond mixture. You might need to press the crumb mixture into the grounds. Set aside.
  6. Next make the balsamic dressing.
  7. Heat balsamic vinegar over low heat on stove. Squeeze in 3 tablespoons of grapefruit juice (roughly a quarter of a grapefruit). Once warmed, stir in agave nectar or honey. Taste for desired sweetness. It should be sweet-tangy. Set aside.
  8. Next, assemble the salads so they’re prepared when medallions are done cooking. Compile spring mix, cucumbers, grapefruit sections, berries, and roughly chopped almonds.
  9. Finally, heavily spray a pan with olive oil (I use Pam Olive Oil). Heat on medium high and place medallions into pan. Cook 2-3 minutes per side until a brown and golden crust forms. Before flipping, spray the uncooked, top side with olive oil (3-4 second spray per round) and gently flip. Allow to cook until also golden and crispy. (You may need to re-spray pan if it looks a tad dry.)
  10. Once medallions are cooked and warmed through center, place on paper towel to soak up excess oil. Let stand 1 minute then place a top salads, drizzle with dressing and serve.
3.5.3208

Let me know if you like it/try it.  And I’ll try and make a separate link in time for a printable version without pictures…just in case!

Filed Under: Healthy, Salads, Side Dishes Tagged With: chevre, goat cheese, grapefruit, salad

Primary Sidebar

Welcome!

Hi, I’m Alyssa! I’m a foodie with a sweet tooth and an obsessed dog-mom! On the blog you’ll find a little bit of everything – it’s heavy on dessert, wine, and life in Austin, Texas with a sprinkling of lifestyle.

Let’s Connect!

  • Email
  • Facebook
  • Instagram
  • Pinterest
  • Twitter

What Readers Are Loving

Slow Cooker Indian Chicken Curry: The Only Curry Recipe You'll Ever Need
Best Ever Bakery-Style Oatmeal Raisin Cookies
Dilly Bars -- Chocolate Peanut Butter Rice Krispie Treats
No-Bake Cake Batter Cake Balls
Lemongrass Coconut Chicken Curry
Street-Cart Style Falafel and Rice Bowls
memorialday80

Follow Me on Pinterest!

Category Search

Footer

  • Email
  • Facebook
  • Instagram
  • Pinterest
  • Twitter

Copyright © 2025 · Foodie Pro Theme by Shay Bocks · Built on the Genesis Framework · Powered by WordPress


Loading Comments...