• Skip to primary navigation
  • Skip to main content
  • Skip to primary sidebar
  • Skip to footer

Her Modern Kitchen

Eating & Living in Austin, Texas

  • About
  • Recipes
  • Austin
  • Lifestyle
  • Baking Bucket List

salad

Crunchy Romaine Summer Salad

May 21, 2020 by Alyssa

Toasted ramen noodles mixed with walnuts and pepitas star in this simple yet flavorful Crunchy Romaine Summer Salad.

My Aunt Kim used to make this Crunchy Romaine Summer Salad for family get-togethers and I remember loving it as a child.  It’s so simple but packs serious flavor.  It’s nutty, salty, acidic, and sweet all in one bite, making it a definite crowd pleaser!

Crunchy Romaine Salad

I was recently reminded of this salad while flipping through some family recipes my Mom gave me and knew I had to immediately make it for <3M.  He loves ramen noodles so I thought throwing them on top of some greens may be a good way to coerce him into eating more veggies (and it worked!).

It’s All About the Crunch

My favorite part about this salad is the crunchy ramen noodle & toasted walnut topping that gives this salad its name.

Yes, you use RAMEN noodles. Raw ramen noodles to be exact — like the kind from the little square packs that come with a side seasoning such as ‘chicken flavor’ or ‘beef flavor.’  Except for this recipe, you just open the noodles, toss the flavor packet, and break up the noddles into pieces for toasting with butter on the stovetop.

It’s delicious.

Looking for more salad recipes? Try my Grilled Shrimp and Peach Panzanella Salad with Basil Vinaigrette

In fact, I remember making this salad with my Mom as a child and eating JUST the topping.  My Mom and I used to spread the warm crunchy topping on top of paper towels to cool then snack on the topping before it ever made it to the salad.

Toasting the noodles, walnuts, and pepitas

Toasting the noodles, walnuts, and pepitas

In fact, when I recently made the recipe, I did the exact same thing!

I laid the crunchy topping out on paper towels and even snapped a pic of it to send in a group text to my Mom & Aunts, asking them to guess what I was making.  They all instantly knew what it was, the unique combination of walnuts and ramen are a dead giveaway for the Crunchy Romaine Summer Salad!

Crunchy ramen noodle topping

Crunchy ramen noodle salad topping

Updating the Crunchy Romaine Summer Salad Recipe

While I love the original recipe, I made a few changes to make the salad a tad healthier than its 90’s version.  

Here are my updates:

  • Added pepitas for a superfood boost in addition to the walnuts and ramen noodles in the topping
  • Reduced the amount of sugar in the dressing by decreasing the amount and swapping honey for white sugar
  • Utilized a tablespoon less butter for toasting the ramen noodles, walnuts, and pepitas

Crunchy Romaine Summer Salad

Other than those three modifications, this recipe is pretty much the same and 100% just as delicious as I remembered.

And best yet, <3M also loved it.  He was just as obsessed with the crunchy ramen noodle topping as I was as a child.

And honestly, I may have to make the topping again all by itself just to have on hand to throw on other salads or dinner options. I highly suggest you do too when you make it.

In fact, just double the topping ingredients so you’ll have plenty of leftovers.

Crunchy Romaine Summer Salad

Crunchy Romaine Summer Salad
 
Save Print
Prep time
20 mins
Cook time
10 mins
Total time
30 mins
 
Crunchy Romaine Summer Salad Author: Alyssa Prep time: 20 mins Cook time: 10 mins Total time: 30 mins Serves: 4 salads
Author: Alyssa
Serves: 4 salads
Ingredients
  • For the salad:
  • 1 head of romaine lettuce, roughly chopped into bite-size pieces
  • 8 scallions, green and white parts sliced into ¼-inch rounds

  • For the crunchy topping:
  • 1 pack of ramen noodles, flavor packet discarded and noodles broke into 1-inch or smaller pieces
  • ¼ cup chopped walnuts
  • ¼ cup raw pepitas
  • 4 tablespoons unsalted butter
  • ½ teaspoon salt

  • For the dressing:
  • ¼ cup red wine vinegar
  • ¼ cup olive oil
  • 2 teaspoon soy sauce
  • 2 tablespoons honey
  • ¼ teaspoon ground black pepper
Instructions
  1. Melt the butter in a large frying pan over medium heat. Add in the walnuts and ramen noodles, stirring to coat the nuts and noodles with the melted butter.
  2. Cook until noodles and walnuts begin to lightly brown, about 5-6 minutes then add in the pepitas and cook for another 3-4 minutes until everything is golden brown.
  3. Sprinkle everything with the ½ teaspoon salt, stir, then remove from heat. Place the topping ingredients on a paper towel to cool until serving.
  4. In a large ball jar or small bowl, add the vinegar, oil, soy sauce, honey, and ground black pepper. Give it a good shake (or whisk vigorously) to combine.
  5. When ready to serve, place the lettuce pieces and scallions in a large bowl and toss lightly with half the dressing. Top with the cooled ramen noodle topping and serve.
  6. Store any additional topping in an airtight container at room temperature for 3-5 days.
  7. Store any additional dressing in the fridge for 3-5 days.
3.5.3251


Filed Under: Salads Tagged With: noodle, pepitas, ramen, salad, walnuts

Grilled Shrimp & Peach Panzanella Salad with Basil Vinaigrette

July 10, 2018 by Alyssa

Grilled Shrimp & Peach Panzanella Salad with Basil Vinaigrette uses seasonal ingredients to create a light but fresh summertime salad.

With a burst of fresh basil, sweetness from perfectly ripe peaches, and a hint of spice from grilled shrimp this panzanella salad is perfectly fit for lunch or dinner.

Grilled Shrimp & Peach Panzanella Salad

I love fancy salads that are both simple and delicious. I also love using seasonal produce in my salads and was inspired by the summer bounty of peaches and basil to create a fresh salad starring both.

This salad was created as more of an in the moment recipe — working with what I had in the kitchen and pairing flavors as I went along. For my base I started with baby kale, sugar snap peas for crunch, and sliced green onions since their flavor isn’t as potent as red onions (plus, I just really dislike raw red onions).

Grilled Shrimp & Peach Panzanella Salad Square

I personally love fresh fruit in my salads and knew I wanted to incorporate juicy, ripe peaches but had to off-set the sweetness they would add to the dish.  In hopes of balancing the naturally sweet peaches, I created a basil vinaigrette that’s heavy on lemon using both real lemon juice and a white lemon balsamic vinegar from Texas Hill Country Olive Oil (my favorite! I also use it in my Cali breakfast toast recipe).  If you’ve never had basil and lemon paired together, you’re missing out. This basil vinaigrette would also make a great dipping sauce for fresh, soft bread!

With both the sweet and acidic elements in check, I began looking for a way to incorporate the slightest hint of spice into my Grilled Shrimp & Peach Panzanella Salad so I tossed the shrimp with cumin, smoked paprika, and a bit more lemon before quickly searing both sides on the grill.

Grilled Shrimp & Peach Panzanella Salad 1

Grilled Shrimp & Peach Panzanella Salad Overhead

For extra crunch and because I love a good crouton, I baked up leftover crusty bread with a drizzle of olive oil and garlic salt until it was golden and crispy. Once tossed with the basil vinaigrette, the croutons became chewy, flavorful bites elevating the Grilled Shrimp & Peach Panzanella Salad to that of restaurant quality!

Fun Fact: <3M and I alway compare fancy at home salads to that of restaurants’, asking one another ‘how much would this salad be at a restaurant?’  This one clocked in at about $14 in our minds!

The end product was a deliciously balanced salad — sweet, acidic, spicy and crunchy from the fresh vegetables and chewy bread. Grilled Shrimp & Peach Panzanella Salad with Basil Vinaigrette is a divine summertime salad perfect for lunch or dinner. Give it a try and let me know what you think.

Grilled Shrimp & Peach Panzanella Salad Pinterest

5.0 from 2 reviews
Grilled Shrimp & Peach Panzanella Salad with Basil Vinaigrette
 
Save Print
Prep time
30 mins
Cook time
15 mins
Total time
45 mins
 
Author: Alyssa
Serves: 4
Ingredients
  • For the panzanella bread
  • 1/2 loaf crusty bread, like ciabatta, cut or torn into 1 inch cubes
  • 2 tablespoons olive oil
  • ½ teaspoon garlic salt

  • For the shrimp
  • 1 pound shrimp, peeled & deveined
  • 1 tablespoon lemon juice
  • zest from half a lemon
  • 1 teaspoon cumin
  • ½ teaspoon smoked paprkina
  • salt and pepper to taste

  • For the basil vinaigrette
  • 4 tablespoons olive oil
  • 2 tablespoon while lemon balsamic vinegar
  • zest from half a lemon
  • 2 tablespoons fresh lemon juice
  • 1 cup fresh basil leaves
  • salt and pepper to taste

  • For the salad
  • 8 cups baby kale
  • 2 cups sugar snap peas
  • 4 green onions, thinly sliced
  • 2 peaches, pits removed and thinly sliced
Instructions
  1. Preheat the oven to 425°F and line a large baking sheet with parchment paper
  2. Toss the bread cubes with 2 tablespoons of olive oil and the garlic salt
  3. Spread the bread evenly on the prepared baking sheet and bake for 10-12 minutes, tossing once halfway until golden brown and crusty. Remove from oven and let cool.
  4. Quickly marinate the shrimp by tossing the shrimp with 1 tablespoon lemon juice, zest, spices, and salt and pepper. Let set 5-10 minutes. When ready to eat, grill the shrimp 2-3 minute per side over a medium flame. Let rest while assembling the salad.
  5. Prepare the basil vinaigrette by placing all vinaigrette ingredients into a food processor and pulsing until the ingredients have emulsified and the basil is finely minced.
  6. To assemble the salad, toss together the kale, sugar snap peas, green onions, peaches, and panzanella croutons. Pour half of the basil vinaigrette over top and toss to coat. Plate the salads and place the cooked shrimp on top. Serve with additional dressing on the side.
3.5.3251


Filed Under: Salads Tagged With: basil, healthy, peach, salad, shrimp, summer

Belle Vie Farm | Farmer’s Market Asian Duck Confit Tacos with

January 25, 2017 by Alyssa

Asian Duck Confit Tacos highlight the duck’s savory, rich flavor in a light yet tangy sauce accented with crunchy cucumbers, scallions, and fresh cilantro!

Have you ever accidentally made something delicious? As in, you set off on your dinner journey and by the end you just happened to create something so extraordinarily delicious, that you become giddy with delight and can’t help but pat yourself on the back at your creative genius?

Because that’s exactly what happened to me with these Asian Duck Confit Tacos.

Asian Duck Confit Tacos

Last weekend, I was feeling rather uninspired in the kitchen. So I grabbed my puppy girl Stella and headed to Austin’s downtown farmer’s market, looking to for a menu muse. Now, winter isn’t actually the prime of farmer’s market shopping — there’s lots of greens, some citrus, root vegetables and squash.  All of which left me feeling kind of ‘meh’ in terms of finding a menu muse.

But, as puppy girl and I were walking by one stand at the market, Stella made a sharp left turn and skimmed her nose along the side of a table that had out a spread of pâté for sampling. Looking up, I noticed the vendor was Belle Vie Farm — the vendor that came recommended by fellow Austin bloggers as a great source for local duck!

Oh puppy girl, Stella, you have splendid taste!

Skimming Belle Vie’s offerings, I noticed they had Duck Leg Confit and I instantly knew that this duck was coming home with me for Saturday night dinner.  Making our way through the rest of the market, Stella and I grabbed a fresh bag of organic arugula, some scallions and treated ourselves to Buddha Brew’s Seasonal Beet Carrot kombucha!

Asian Duck Confit Tacos

Skipping back to the car, my mind started tossing around all the wonderful ways to use my farmer’s market finds! After much deliberation and a bit of input from <3M, it was decided this duck would be best served simply to highlight its savory, rich flavor with a bit of sweet, salt and tang — thus, Asian Duck Confit Tacos were born.

Since the Duck Confit is fully cooked, this meal is rich in flavor but easy in execution, the whole thing came together in less than 20 minutes.  The duck leg is complimented by a simple, homemade Asian sauce topped with crunchy, crisp cucumbers, a sprinkling of scallions and a touch of cilantro.

Asian Duck Confit Tacos

The combination is savory and filling while somehow remaining light. Served up next to an arugula salad the tacos are complimented by the arugula’s own peppery spice, more cucumbers and scallions, and a generous topping of salty feta cheese all tossed in a light olive oil and lemon balsamic vinaigrette.

These Asian Duck Confit Tacos turned an ordinary, uninspired Saturday into a special, at-home date night for <3M & I — it was meal we raved about for days and can’t wait to make again.

Asian Duck Confit Tacos

So if you’re in the need of some inspiration and a menu muse, grab yourself a bit of duck confit and whip up these Asian Duck Confit Tacos to reinvigorate your cooking spirit!

5.0 from 3 reviews
Asian Duck Confit Tacos with Simple Arugula Salad
 
Save Print
Prep time
10 mins
Cook time
10 mins
Total time
20 mins
 
Asian Duck Confit Tacos highlight the duck's savory, rich flavor in a light yet tangy sauce accented with crunchy cucumbers, scallions, and fresh cilantro!
Serves: 4 tacos
Ingredients
  • FOR THE TACOS
  • 1 duck leg confit
  • 1 scallion
  • 1 English cucumber
  • 2 tablespoon cilantro
  • 1 clove garlic
  • 2 teaspoon grated ginger
  • 4 tablespoon soy sauce
  • 4 tablespoons vegetable broth
  • 2 tablespoons hoisoin sauce
  • ½-1 teaspoon Chinese Five Spice
  • 4 corn tortilla shells
  • 1 teaspoon black sesame seeds
  • Olive oil spray
  • FOR THE SALAD
  • 4 cups arugula
  • 1 teaspoon garlic olive oil*
  • 1 tablespoon lemon white balsamic vinegar*
  • 2 teaspoons red wine vinegar
  • ¼ teaspoon grated garlic
  • 2 tablespoons crumbled feta cheese
  • Salt and pepper to taste
Instructions
  1. Prep the duck confit by removing the meat from the bone and set aside.
  2. Prepare the taco toppings by slicing the scallion and cucumber into thin rounds and roughly chopping the cilantro, set aside until serving.
  3. Make the sauce by spritzing a medium sized sauce pan with olive oil spray and warm over medium heat.
  4. Sauté 1 clove of garlic and 2 teaspoons of grated ginger for 2 minutes.
  5. Add 4 tablespoons of soy sauce, 4 tablespoons of vegetable broth, 2 tablespoons of hoisin sauce and ½-1 teaspoon Chinese Five Spice. Mix until combined and the sauce just begins to bubble. Add in the prepared duck meat and turn the stove to low to warm duck meat. Once warm, leave the pan on the burner but turn it off.
  6. Assemble tacos by warming taco shells in a small skillet until lightly browned in some spots. Divide the duck meat between the 4 taco shells, topping with any additional sauce. Layer on prepared cucumbers, scallions and a bit of cilantro. Sprinkle with sesame seeds and serve.
  7. To assemble the salad, place the arugula in a large bowl and set aside.
  8. In a small bowl, whisk together the olive oil, white vinegar, red wine vinegar, and grated garlic.
  9. Drizzle atop the arugula and toss to distribute. Salt and pepper to taste.
  10. Before serving, top with crumbled feta.
Notes
*If you don't have garlic olive oil or lemon white balsamic, simply add a bit more garlic and a squeeze of half a lemon to the salad.
3.5.3226

Asian Duck Confit Tacos Pinterest


Filed Under: Main Entrees, Restaurants, Tex-Mex Tagged With: asian, duck, salad, taco

Cold Sesame Soba Noodle and Cucumber Salad with Poached Shrimp

August 24, 2016 by Alyssa

This Cold Sesame Soba Noodle and Cucumber Salad with Poached Shrimp is a healthy, filling Asian-inspired salad, perfect for lunch or a light dinner

During warmer months, I crave lighter, fresher dishes and this Cold Sesame Soba Noodle and Cucumber Salad with Poached Shrimp fits my summertime menu perfectly! It brings a bit of Asian flare with chilled soba noodles, edamame, cucumber and a light sesame seed oil dressing. Topped with a few pieces of chilled shrimp and sliced avocado, this salad is a filling, healthy meal that can easily transition between lunch and dinner!

cold sesame soba noodle and cucumber salad

My Cold Sesame Soba Noodle and Cucumber Salad recipe is inspired by the Vegan Soba Salad at one of my favorite sushi restaurants here in Austin, Kome.  Sadly, Kome seems to no longer serves this dish but my version hits all the same flavor notes and can be made vegan simply by leaving out the poached shrimp or substituting it with a bit of tofu.

When creating this Cold Sesame Soba Noodle and Cucumber Salad, my aim was to incorporate my favorite Asian flavors while balancing the salad’s healthy attributes. Much like Kome’s salad, mine begins with soba noodles but also includes cucumber noodles in its base.

Soba noodles are a wonderful addition to any diet and are made from buckwheat flour. Buckwheat is considered a heart healthy grain that has been proven to help prevent heart disease. It’s also a great source of protein, fiber and iron when compared to similar servings of traditional flour-based noodles. Because buckwheat is a whole grain, soba noodles are slow digesting which ensures you’ll stay fuller longer and maintain balanced blood sugar levels while digesting. Needless to say, this is a light meal that will satisfy a hungry appetite!

cold sesame soba noodle and cucumber salad 2

Although the addition of cucumbers strays a tad from Kome’s version, the cucumber noodles help bulk up the salad without denting its health benefits. I prefer using a spiralizer, like this one, to make cucumber noodles but if you don’t have one available, you can simply substitute thinly sliced cucumber halves.  The addition of cucumbers also brings a coolness to the already chilled dish, making it a refreshing meal.

cold sesame soba noodle and cucumber salad 4

Keeping with the Asian theme, I incorporated edamame, scallions and black sesame seeds into the Cold Sesame Soba Noodle and Cucumber Salad. For the dressing, I chose to use tamari for a bit of saltiness, sesame seed oil as a savory element, and rice wine vinegar to balance out the flavors with the rice wine vinegar’s natural tang and sweetness.

I like pairing poached shrimp with this salad for added protein, as the shrimp are delicate enough to blend with the salad without competing with the light Asian flavors.  To finish the salad, I add a few slices of avocado for healthy fat, a dash of red pepper flakes for spice and a sprinkle of black sesame seeds. The black sesame seeds definitely aren’t necessary but they do take this homemade salad up a notch, making it feel like a special, fancy meal!

cold sesame soba noodle and cucumber salad 3

My Cold Sesame Soba Noodle and Cucumber Salad recipe makes a rather large portion. <3M and I enjoyed it for dinner one night then again for a few lunches in the following days. If you plan to make the full recipe and choose to eat it for several meals, I suggest leaving the cucumber out and simply adding it in as you serve each meal so the cucumber maintains its fresh crunch!

cold sesame soba noodle and cucumber salad

Whether you have this for lunch or dinner, it’s a meal I know you’ll enjoy eating and your body will thank you for making.

 
Save Print
#version#

Cold Sesame Soba Noodle and Cucumber Salad with Poached Shrimp
 
Save Print
This Cold Sesame Soba Noodle and Cucumber Salad with Poached Shrimp is a healthy, filling Asian-inspired salad, perfect for lunch or a light dinner
Serves: 6 salads
Ingredients
  • 1 pound shrimp, fully cooked with tails removed and chilled
  • 1 9-ounce package of soba noodles
  • 1 cup shelled, edamame
  • ½ cup (~1 bunch) scallions, whites and greens sliced
  • 2 large seedless cucumbers, spiralized into noodles
  • 3 tablespoons tamari (or soy sauce)
  • ¼ cup rice wine vinegar
  • 1 tablespoon lime juice
  • 1 teaspoon grated ginger
  • 1 small clove garlic, minced
  • ½ teaspoon salt
  • Optional: avocado, red pepper flakes, black sesame seeds & additional rice wine vinegar
Instructions
  1. First, prepare an ice bath to shock the soba noodles and edamame once they're cooked.
  2. To do this, place cold water in a large bowl, fill with ice then set aside.
  3. Next, prepare the noodles and edamame by bringing a large stockpot of water to boil (do not salt the water).
  4. Once boiling, add in the uncooked soba noodles and set a timer for 4 minutes.
  5. After 3 minutes of cooking, add the shelled edamame to the soba noodles and boiling water.
  6. At the 4 minute mark, strain the soba noodles and edamame then immediately place the strainer into the prepared ice bath to stop the cooking. Let sit 2-3 minutes then remove and strain completely. Set aside.
  7. To prepare the dressing mix together the tamari, rice wine vinegar, sesame seed oil, lime juice, ginger, garlic, and salt.
  8. Place the soba noodles and edamame in a large bowl then add in the cucumber noodles.
  9. Pour the dressing over the noodles and using tongs, toss to incorporate. Stir in the scallions.
  10. Chill for at least 1-2 hours before serving.
  11. To serve, place a portion of the noodle salad in a bowl, top with a few slices of avocado and 5-6 poached shrimp. Sprinkle with red pepper flakes, sesame seeds, and a small splash of rice wine vinegar, if desired.
#version#

Filed Under: Salads Tagged With: asian, buckwheat, cold salad, salad, seafood, shrimp, soba noodle

Athenian Garbanzo Bean Salad with Green Apple Vinaigrette

June 1, 2016 by Alyssa

Athenian Garbanzo Bean Salad 2Inspired by a trip to Greece, this Athenian Garbanzo Bean Salad with Green Apple Vinaigrette is a sweet, tart, savory and crunchy salad – perfect for summer dining.

A few weeks ago <3M and I took a dream vacation to Rome, Italy and Greece, visiting the island of Santorini and spending a few days in the city of Athens. It was seriously a foodie’s vacation. We honestly ate our way across the two countries. There was no holding back. We ate everything — bread, wine, cheese, pasta, sweets — is your mouth watering yet?

Below are a few snapshots of some of my favorite bites from the trip plus a few breathtaking views. If you want more, head over to my Instagram and scroll back to early May for extra meals pics and trip highlights.

FoodCollage - Europe

SiteCollage - EuropeWhile I tasted my way across Italy & Greece, I was taking notes on my favorite dishes so when I landed back home in my own kitchen, I could recreate my most memorable meals, like this Athenian Garbanzo Bean Salad with Green Apple Vinaigrette. <3M & I shared this Garbanzo Bean Salad while dining in Athens and it was definitely one of our favorite dishes of the trip.

Athenian Garbanzo Bean Salad - Ingredients

One reason I absolutely love Greek food is because everything is prepared very simply, using fresh ingredients and this Athenian Garbanzo Bean Salad with Green Apple Vinaigrette is no exception.

Each ingredient in the bean salad is easily identifiable which is why it was so easy to recreate at home. My favorite ingredient in this bean salad is definitely the surprise pop of pomegranate arils. They’re crunchy, sweet and also a bit tart.

Athenian Garbanzo Bean Salad - Mixed

If you’ve never worked in a pomegranate before, there’s no need to feel intimidated. You can purchase pomegranate arils at the store but you can also purchase a whole pomegranate and remove the arils on your own. The process really is quite simple and straight forward:

  • Fill a large bowl with cold water and place it in your sink
  • Cut the pomegranate in half
  • Hold a pomegranate half  over the bowl filled with water and use your fingers to gently break the arils away from the white pulp. If there’s any juice splatter, your sink will keep it from staining your kitchen.
  • As you break away the seeds, they’ll fall into the water and sink to the bottom of the bowl, while the pulp will float to the top
  • Once you’re done, skim the white pulp from the bowl, strain out the water and you’re left clean pomegranate arils that are ready to eat!

If that’s too much, there’s also this nifty trick where you beat the pomegranate with a wooden spoon to remove the arils but in my attempts, this didn’t work and I actually broke my wooden spoon. If you have any luck with this method, let me know but I believe it also depends on the age/ripeness of your pomegranate. Either way, I guarantee my above method works.

If you have any luck with this method, let me know! Either way, I guarantee my above method works.

Athenian Garbanzo Bean Salad

Like the salad ingredients, the dressing is also very simple with a bit of olive oil, apple cider vinegar, lemon and a touch of honey. All together this Athenian Garbanzo Bean Salad with Gren Apple Vinaigrette is sweet, tart, savory and crunchy.

Athenian Garbanzo Bean Salad 3

Like most meals I make, this Athenian Garbanzo Bean Salad with Green Apple Vinaigrette can be thrown together in less than 20 minutes. It tastes great freshly made but I definitely prefer to let the bean salad sit for at least an hour to chill and let the flavors marinade and blend together. This bean salad is perfect for a warm summer night paired with a bit of grilled shrimp or chicken. It’s also great served atop a bed of lettuce for a light, vegetarian lunch.

3.0 from 1 reviews
Athenian Garbanzo Bean Salad with Green Apple Vinaigrette
 
Save Print
Prep time
10 mins
Cook time
10 mins
Total time
20 mins
 
Serves: 4-6 salads
Ingredients
  • 3 cups garbanzo beans
  • 1 medium tart green apple (like a Granny Smith), chopped to a quarter inch
  • 2 tablespoons red onion, diced
  • ¼ cup golden raisins
  • pomegranate arils, from half of a pomegranate
  • ¼ cup fresh mint, finely chopped*
  • ¼ cup olive oil
  • 2 tablespoons apple cider vinegar
  • 1 tablespoon honey
  • 1 teaspoon ground cumin
  • ½ teaspoon salt
  • ½ teaspoon pepper
  • juice of half a lemon
Instructions
  1. In a small bowl, whisk together the olive oil, apple cider vinegar, honey, lemon juice, cumin, salt & pepper until emulsified. Set aside.
  2. In a large bowl, mix together the garbanzo beans, chopped green apple, diced onion, raisins, and pomegranate arils.
  3. Pour the dressing over the garbanzo bean mixture and gently toss to coat.
  4. If serving immediately, fold in the fresh mint.
  5. If serving later, place the salad in the fridge to chill for at least an hour and just prior to serving, chop and fold in the mint.
Notes
Once mint has been cut, it bruises easily and turns brown or black in color rather than a bright, fresh green. To avoid this, chop and add your mint to the salad just prior to serving.
3.5.3208

Athenian Salad - Pinterest

Filed Under: Salads, Side Dishes Tagged With: athens, greece, pomegranate, salad

Artichoke & Leek Fritatta

April 28, 2015 by Alyssa

Our 2nd CSA box from Johnson’s Back Yard Garden contained a lot of the same veggies as last time – which meant we repeated a few of the recipes from the first box and threw in a few new ones too.

Photo from of JBG, Week of April 20th CSA Box

Photo from of JBG, Week of April 20th CSA Box

Artichokes & Leeks – I really hate fresh artichokes. They’re so fussy and the end result is hardly worth my efforts. Personally, I’m more than wiling to pay a premium at the grocery store to have someone else do all the prep work so I can easily begin cooking with just the artichoke hearts.

That being said, I did waste a half hour of my life trimming the ‘chokes, steaming them and plucking out the rich hearts in order to make an Artichoke & Leek Frittata (recipe below). It’s something I’ve made before, it’s delicious, healthy, and filling. We enjoyed ours as is but it’s also great served with a side salad or some garlic bread!

Fotor_143026165678924_1

Beets  – If it ain’t broke, why fix it? I went with the same pickled beet recipe as last time and am still enjoying them on my salads and in wraps for lunch!

Carrots & Red Spring Onions – Carrots in our house usually end up as hummus dippers on the side of a salad or as roasted carrot fries, as last time. But with this CSA box, I wanted to get a little creative and was inspired to make a carrot soup.

The bright orange color and the fresh carrots just sang spring, making this soup delicious, filling and satisfying.  The soup is very simple with only a handful of ingredients but the result is a refined, slightly spiced, carrot soup.  I garnished our soup with some homemade, roasted chickpeas which gave the soup texture and a wonderful crunch. Here’s a recipe similar to what I made for both the carrot soup and the spiced chickpeas.

Carrot Soup, Tahini Kale Salad & Spiced Chickpeas

Carrot Soup, Tahini Kale Salad & Spiced Chickpeas

Kale – Sometimes simple is best. This time around, I made a simple kale salad with a tahini-lemon dressing massaged into the kale. This salad is flavorful, slightly nutty and has a fresh, spring lemon flavor that compliments the earthiness of the kale. We paired the kale salad with the carrot soup and topped the salad with more of the roasted chickpeas. I’ve detailed the kale salad recipe below.

Parsley – Last CSA box, we really enjoyed the Chimichurri sauce and used the leftovers as dressing on salads for lunch the remainder of the week. So when we received another beautiful bunch of parsley, I had to recreate the Chimichurri sauce once more.  We topped both grilled chicken and grilled salmon with the sauce. While creating the sauce, I also utilized a few of the red spring onions from our CSA box.  This time around, I did tweak the Chimichurri sauce, reducing the olive oil by half and swapping in vegetable stock to ‘healthily’ it a bit.

Romaine & Spinach – At heart, I’m a true salad lover. So our two heads of romaine and bundle of spinach were quickly turned into salads for lunch, wilted into tomato, feta, and spinach omelets and made into lettuce buns for turkey burgers, keeping with the low-carb dinners.

Artichoke & Leek Fritatta
 
Save Print
Prep time
10 mins
Cook time
20 mins
Total time
30 mins
 
A light, easy meal! Great for a weeknight dinner or weekend brunch.
Serves: 4
Ingredients
  • 2 medium leeks sliced and cleaned
  • 8 artichokes heart, chopped into ½ inch pieces
  • 1 tablespoon, chopped fresh tarragon (or 2 tsp dried tarragon)
  • ½ teaspoon salt & ½ teaspoon pepper
  • 4 eggs
  • ½ cup non-fat ricotta cheese
  • 2 Tbsp all purpose flour
  • ½ teaspoon baking powder
  • ½ cup grated Parmesan cheese
Instructions
  1. Preheat oven to 425 degrees
  2. Spray an 8x8 or 9x9 oven proof pan with olive oil or non-stick spray and set aside.
  3. In a medium bowl, whisk together the eggs and ricotta. Whisk in the flour, salt, pepper, Parmesan, and baking powder. Set aside.
  4. Spray a large skillet with olive oil and place over medium-heat on the stove. Once warm, add the sliced leeks and gently cook until softened, about 10 minutes stirring often to avoid excessive browning.
  5. Once the leeks are cooked through and softened, add the artichoke hearts to the skillet until warmed then remove from heat.
  6. Gently stir the artichokes and leeks into the egg mixture. Note that the color of the mixture may change, don't worry if this happens, it will go back to normal when cooked.
  7. Pour the mixture into the prepared 8x8 or 9x9 baking pan and place in oven to cook for 20 minutes. After 20 minutes, the top should be slightly brown check for doneness by pricking a toothpick into the center. If it comes out clean, it is done. If not, return to over for 5 additional minutes and repeat toothpick process until the toothpick comes out clean.
  8. To serve, cut into 4 large pieces and sprinkle each with a bit of additional Parmesan.
3.5.3208


Filed Under: Breakfast, Healthy Tagged With: austin, csa, fritatta, johnson's backyard garden, kale, salad

Panko Crusted Goat Cheese Salad

January 25, 2012 by Alyssa

Usually while dining, the term “cheesy” refers to calorie bomb, most often in the form of a creamy, gooey,  or melted.  Though delicious, this cheese is usually accompanied with something being fried (MozzSticks), smothered (Enchiladas), or creamy (Alfredo).

Now cheese isn’t bad but there is a good and bad way to eat it.

CheeseStick – Good: Go for lowfat and have it with some almonds or an apple as an afternoon snack.  I love Sargento because they even make flavored sticks like Pepper Jack & White Cheddar to switch it up.

Feta- Good: Enjoy it on a salad.  The harder the cheese the better it is for you, honestly. Atheno is  my personal favorite, even the reduced-fat version is amazing. Sprinkle it on salads and wraps.

Alfredo – Bad: It not only involves cheese but cream as well which is code for fat.

Queso – Bad: Not only is it creamy, gooey, and melted but it comes with a side salty chips.  And you no, once you start you can’t stop.

If you really want cheese in your diet – try shredded cheese, a little goes a long ways and make it the reduced-fat or part-skim version.  Cabot makes a great 50% fat free cheese in a variety of flavors.  Need blue cheese, swiss cheese, Mexican cheese, or an herby cheese?  Try Laughing Cow wedges.  They’re 35 calories and low in fat.  I’ve used them for quesadillas, buffalo wraps, alfredo sauces, and even just plain ol’ cheese & cracker snacks.  This company is also the maker of the famous mini Babybel cheese rounds.  Those are good in moderation as well – like a cheese stick type snack.

This being said, the king of cheese, at least in my opinion, is Goat Cheese aka Chevre. It’s French.  It’s fancy.  It’s creamy.  It’s decadent. It’s full of flavor.  It usually have 70-80 calories per ounce and around 6g of fat. Totally reasonable for cheese.  Plus they make all types – spreadable logs, crumbles, and even cream cheese, I have a Fig flavor that’s great on bagel thins.

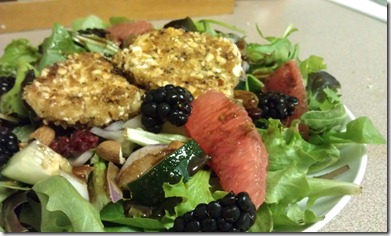
The below recipe is my ode to Chevre.  Healthified of course!  Often times while dining out, I’m drawn to a specific goat cheese salad, the encrusted goat cheese medallion salad that I often find on restaurant menus.  However, I’ve never ordered it for I know the truth about this salad.  This once healthy salad is destroyed in a restaurant kitchen with a dip in the fryer resulting in oil soaked cheese rounds.

So here’s my version at home version that’s quick and healthy.

IMAG1228

Encrusted Goat Cheese Salad with Grapefruit Balsamic
 
Save Print
Prep time
30 mins
Cook time
20 mins
Total time
50 mins
 
Serves: 2 salads
Ingredients
  • ¼ cup panko bread crumbs
  • 3 tablespoons whole almonds, finely chopped in a food processor
  • ¼ teaspoon salt
  • ¼ teaspoon pepper
  • ½ teaspoon dried basil
  • 3 tablespoons flour
  • 3 tablespoons liquid egg whites or 1 egg white
  • 1-4oz log of Chevre cut into 6 rounds
  • 1 grapefruit (3/4 sections with skins removed, ¼ used for juicing)
  • Spring mix (3-4 cups or desired salad size)
  • ¼ cucumber, diced
  • a handful of berries of choice, as garnish
  • additional almonds, coarsely chopped, as garnish
  • ¼ cucumber, diced
  • handful of berries of choice, as garnish
  • additional almonds, coarsely chopped, as garnish
  • 3 tablespoons fresh squeezed grapefruit juice (about 1 quarter of the fruit)
  • 3 tablespoons balsamic vinegar
  • 1 – 2 teaspoons agave nectar or honey
Instructions
  1. In a bowl mix breadcrumbs, almonds, salt, pepper and basil.
  2. In a 2nd bowl, place flour.
  3. In a 3rd bowl place egg whites.
  4. Next, cut four goat cheese rounds. If you have trouble cutting the rounds, warm the knife under hot running water to make the cut a bit easier, then mold and flatten to get your desired round shape.
  5. Take our four goat cheese rounds and dip the rounds in the flour then egg whites, then panko-almond mixture. You might need to press the crumb mixture into the grounds. Set aside.
  6. Next make the balsamic dressing.
  7. Heat balsamic vinegar over low heat on stove. Squeeze in 3 tablespoons of grapefruit juice (roughly a quarter of a grapefruit). Once warmed, stir in agave nectar or honey. Taste for desired sweetness. It should be sweet-tangy. Set aside.
  8. Next, assemble the salads so they’re prepared when medallions are done cooking. Compile spring mix, cucumbers, grapefruit sections, berries, and roughly chopped almonds.
  9. Finally, heavily spray a pan with olive oil (I use Pam Olive Oil). Heat on medium high and place medallions into pan. Cook 2-3 minutes per side until a brown and golden crust forms. Before flipping, spray the uncooked, top side with olive oil (3-4 second spray per round) and gently flip. Allow to cook until also golden and crispy. (You may need to re-spray pan if it looks a tad dry.)
  10. Once medallions are cooked and warmed through center, place on paper towel to soak up excess oil. Let stand 1 minute then place a top salads, drizzle with dressing and serve.
3.5.3208

Let me know if you like it/try it.  And I’ll try and make a separate link in time for a printable version without pictures…just in case!

Filed Under: Healthy, Salads, Side Dishes Tagged With: chevre, goat cheese, grapefruit, salad

Primary Sidebar

Welcome!

Hi, I’m Alyssa! I’m a foodie with a sweet tooth and an obsessed dog-mom! On the blog you’ll find a little bit of everything – it’s heavy on dessert, wine, and life in Austin, Texas with a sprinkling of lifestyle.

Let’s Connect!

  • Email
  • Facebook
  • Instagram
  • Pinterest
  • Twitter

What Readers Are Loving

Slow Cooker Indian Chicken Curry: The Only Curry Recipe You'll Ever Need
Dilly Bars -- Chocolate Peanut Butter Rice Krispie Treats
Best Ever Bakery-Style Oatmeal Raisin Cookies
No-Bake Cake Batter Cake Balls
Lemongrass Coconut Chicken Curry
Street-Cart Style Falafel and Rice Bowls
memorialday80

Follow Me on Pinterest!

Category Search

Footer

  • Email
  • Facebook
  • Instagram
  • Pinterest
  • Twitter

Copyright © 2025 · Foodie Pro Theme by Shay Bocks · Built on the Genesis Framework · Powered by WordPress


Loading Comments...